Tuesday, September 3, 2013

Kitchen Projects!

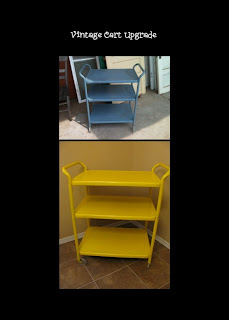
I am so excited about these two new projects that I am telling anyone and everyone about them. We are working on updating our kitchen/dining room (more to come on the other projects).  I haven't really done much to decorate our dining room because honestly, it is the least used room in our home.  I like to decorate my dining room table with fun tablecloths and decorations, but as for the walls or any other decorations, there isn't much in there.  Well, that is about to change.  I have said it before, and I'll say it again, I love vintage items and I have always wanted a vintage drink cart.  I love the look of them but since they are vintage that usually means they are expensive ($60-$250).  About a year ago I almost bought one for $40 (that was a lot cheaper than I had seen), it was a little wobbly, but I thought I could handle it.  I ended up passing on it and I'm glad I did because a couple weeks ago I found one for only $20 (half price!) and it is super sturdy!
It was this horrid blue color 
but we changed that quickly with some spray paint 
and now it is a lovely yellow!

I'm not sure what  I'm going to put on it, we don't drink so it's not going to look like the typical drink carts, but I think I can fancy it up.  Now, I just need to find a picture for one wall and add in a few more decorations.  It's a work in progress, but I have learned to take my time and get items in the colors I really love and to wait to get things I will love for a long time.

The next project I've been working on was so much fun that I didn't want it to end.  We are working on updating our kitchen cabinets, and I started thinking about the decorating possibilities for above our kitchen cabinets.  I measured first and we have about a foot of room between the top of the cabinets and the ceiling. The only issue I have it that we have about an inch difference between the top of the cabinets and where the molding is on the outside of the cabinets; so whatever we sit up there, it 'looses' about an inch of the bottom if it.  I think I can work around that though.  So, of course I went straight to Pinterest to get ideas, and of course I got almost overwhelmed.  There are so many cute ideas but after I found some cute kitchen printables, I narrowed down what I wanted.  I found a lot of framed pictures (with free prints you could download) and canvas prints with kitchen utensils and cute sayings, like a mixer that says 'whip it, whip it good.'  Well, I either didn't like the coloring or didn't want to buy the canvas for $75 (crazy!) so I thought, I can make my own!

All I did was open a word document and the internet.  I started off by searching for utensil silhouettes (fork, spoon, egg beater, spatula, etc) in black (there were a few I had to put in paint and make black).  Then I downloaded a few cute (free) fonts.  I inserted the utensil, centered it, then added my text, and printed.  I did about nine different documents in about 20 minutes.  I then found some document frames at Deal's for only $1.  My husband helped to spray paint those to our kitchen colors (yellow, red, teal, and green).  I inserted the printed documents into the frames and viola! instant cute decor!

On the right is the $75 canvas where I got my idea 
and on the left is my re-imagined creation. 

The printed documents. I kept it simple with just black text
 because I wanted to the frames to have the color 'pop.'  

This one is my favorite because my husband says this all the time.

The collection!
I have a couple ideas of how I'm going to position these above the cabinets.  The great thing about document frames is that you don't have to worry about resizing your printed document, but the bad thing is they don't have easels on the back so you have to get creative.  I loved this project and want to do some more, but I ran out of cute sayings.  Any ideas?

:)
Miranda

Meal Planning....or lack thereof....

I mentioned in an earlier post about kitchen organization that after going through every single item I had in my kitchen, organizing it, and even documenting it, that I was going to attempt to meal plan.  I will admit this, I did try.  But I will also admit, I failed....miserably. 

I searched through the internet looking for meal planning guides and found too many to count; but none that looked like they would actually work for me.  I tried just writing out my own simple weekly plan.  Monday- blank, Tuesday-blank, Wednesday-blank, etc.  But it seemed like every time I tried to fill it out I realized that was the week we had activities every night.  We would plan out Monday's meal, then I knew we would have left overs for Tuesday, then it was we had plans Wednesday after church, so no meal at home, then Thursday I would have to work the closing shift, then Friday we'd have another set of plans, then, and then and then.... It seemed like we never had a week where we could plan out a week worth of meals or even two days without something happening.  So, I figured out.....meal planning does not work for us.  Actually, meal planning kinda stinks.  There, I said it. 

I'm sure meal planning works well for millions of people, just not for us....at least for now.  For just two people it just didn't work out.  Having a list of what we have in our panty and freezer has worked out perfect for us though.  We can quickly scan it, see what we have, and plan our meals that way.  If I do want to make something special, I can look to see if I have the ingredients quickly and plan out what I need easier.
Oh, and making meals and freezing them?....didn't work either....I tried making a couple casserole type dishes and freezing them, but I just got frustrated once I went to cook them because they were so frozen it took almost twice as long to cook them all the way through.

So, it didn't work....oh well...moving on....
:)

Friday, July 19, 2013

Seashell Wreath

I made this seashell wreath earlier this week and I love it!  I bought this wreath ages ago at a thrift store (I think) and it has been sitting in the closet so I thought it was about time it got used!  The seashells came with a candle holder we got for our wedding but I didn't use them.  I wanted to make a fun beachy wreath after coming back from the beach a couple weeks ago.  I looked at hundreds of pictures on Pinterest before deciding to just make it instead of trying to make it look just like one someone else had made.

I laid out the seashells first then just started hot-gluing.  I had a lot of the white shells so I added another row.   

 A few 'special' seashells deck out one of the sides.
Such a simple, easy wreath and I LOVE it! :)

Tuesday, July 16, 2013

Kitchen Organization

My husband and I (like others, hopefully) have the same discussion almost nightly, "What do you want for dinner?" because we don't have anything planned.  We stand there, stomachs growling, with nothing thawed out, and as I always say, "nothing quick and easy" to fix.  We both are guilty of never planning ahead, although we have had good intentions in the past.  We have discussed, over and over, our grocery budget, meal planning, and eating what we have.  I always say we have a house full of food, but nothing to eat.  Anyone with me on this?  It seems like we always buy groceries but don't buy for meals.  So even when we finally do decide what we want, we are missing ingredients or have to try and thaw out super frozen chicken.

Hopefully, this is about to change..... 

Step 1: Take inventory of what we do have.  
Stage one of my plan was completed today and not going to lie, took a lot longer than I thought it would.  But I'm also very OCD about things and probably did more than I needed to.
(Tip: I recommend completing this step the day before trash pick up, not the day of.)
I started with a clipboard and washcloth (to clean as I went- smart huh?)

The freezer was first.  I went through item by item and wrote it down and how many of each we had.  We often buy chicken and ground turkey in bulk packages because it is cheaper and then divide it up and freeze it.  So, I had 3 bags of ground turkey, 4 of fish, etc.  I also organized as I went.  Now all the frozen vegetables are on one shelf, meat is in a pull-out drawer, etc.  I also condensed as I went, we had a huge tub of ice cream that was almost empty, so I emptied it into a small container- takes up a lot less room now (although to be truthful, I really considered just eating it to get it out of the way! :) )

Next, was the refrigerator.  I know everyone probably knows great ways to organize their fridge- do whatever works for you.  We have a pretty good system and we know what works for us.  I did pull those items that get pushed to the back up front so we will see them and eat them (like the canned beets from my grandma).  I didn't write down everything in the fridge because those things like ketchup and mayo are staples and will always be there.  But I did write down things like wing sauce and hot sauce.  I bought these for recipes, only used part of it, and now the rest just sits there and takes up room.

Then I moved on to our pantry cabinet/storage cabinet.  I moved some things around, so hopefully we will see it and be more likely to eat it. We have a storage cabinet in our laundry room with 'back-stocked' supplies.  Like all the ingredients for the deer chili my husband makes and takes to work once a month.  Most of that stuff didn't move because it isn't stuff we use daily or weekly even.

I even did our spice cabinet- we have doubles of a lot of spices.  It will also be handy when I have a recipe that calls for something specific, I can just look at our list instead of digging around. 

Something else I did as I went was add items to our grocery list that I knew we needed.  Like crackers to eat a jar of jalapeno jelly with.
Tip: if you have a smart phone I highly recommend the app 'Any List.'  My husband found it and it is amazing!!  You can create different lists, like a grocery list, and share it with however many people you want.  So, my husband and I share a grocery list- we both can see everything we add to it.  It is nice because if my husband runs to the store and I think of something else we need while he is gone I can add it to the list, and it instantly pops up so he can see it.  I really can't say enough about it- I could write an entire post about it! 

After I had everything written down- several hours later- I almost felt ashamed.  We are very fortunate and have a ton of food.  We have food to last us a long time- we shouldn't complain about having nothing to eat, because we have a lot.  I then typed my lists and separated everything into categories.  This is where my OCD really kicked in.  I have a list for freezer, refrigerator, cabinet, canned goods, soups, extras/back stock, pasta, etc.  The list are all alphabetized too.  NERD ALERT!  Am I right?  Oh, well.  I then posted the signs inside the cabinet door.  My plan is to mark items off as we eat them so 1) we can see what we really do eat, and 2) I will be able to meal plan (step 2).


Step 2: Meal plan around what we already have. 
This will not be happening today.  Organizing and taking inventory took way longer than I thought and wore me out.  Maybe tomorrow...or later tonight.  I really do love to organize- it relaxes me.

Step 3: Freezer Meals/ Weekly Meal Plan
Definitely not today...next week maybe :)


Tuesday, May 14, 2013

Jeweled Letter

As with many projects, this one started out as something different.  I wanted to make something unique for my grandmother's birthday.   I had planned to take this letter and put flowers on it, but when I realized my flowers were too big, I knew I was going to have to improvise.  Luckily, I remembered I had a huge bag of beads leftover from my mom.  I used them to decorate the letter and it ended up looking pretty awesome and being super easy.

I started out by spray painting the letter gold, because that's a color I had and I knew I wouldn't be using it for anything else. 


I don't know if it was the type of paint or what, but it didn't take any time to dry.  Once the paint did dry, I got out my clear glue and started gluing down beads.  I put a small dab of glue, threw some beads on top, and then added some more glue, and so on.  The smallest beads worked best.  I used a lot of 'seed' beads.  


All I did was just keep gluing and placing beads on top. I wanted a colorful look so I didn't do any pattern or even separate out the colors.


Once I covered the whole letter, I went back and filled in some bare spots.  I let it sit for a night, then the next day went back over a couple holes.  I then took the clear glue and put a small layer over the whole thing to 'lock' it all in.  I had a few drips over the sides, which I tried to clean up quickly because it ends up making a mark. 

I thought it turned out really pretty. It was a quick and easy project.  I'm thinking about making some for my house.  Maybe my initials or something.  I'm also playing around with the idea of doing more of a pattern, but that will require me to sort through my huge gallon bag of beads....not something I think I'll have the patience for right now.  :)


Monday, May 6, 2013

Polka-Dot Ribbon Wreath

Oh goodness, I have fallen into a crafting rut but hopefully this new wreath project has pulled me out of the depths.  It is so easy to get into the habit of just looking on Pinterest and not doing.  As I put away my spring decorations, I realized I really needed a new wreath...it had been too long since I had made one.  I've seen a ton of cute wreaths on Pinterest and it is hard to find one you like enough to take the time to make.  I found a cute wreath and the caption said it was a fabric wreath, but when I clicked on the picture to learn how to make it, I found out the blog where the picture came from was not a working link (grrr!).  But I studied the picture and realized the fabric looked like it had ribbon mixed it.  As I was standing in the isle at Hobby Lobby, I figured I'd just get ribbon- so much easier and cheaper than fabric I think. 

The ribbon was 50% off (yay!) and I already had a wreath at home.  I had bought the wreath around Halloween at Target for $3- it's great because it's a half circle- flat on the back so it will lay flat against the door.  I ended up using only five rolls of ribbon.  I picked out the pink polka dot ribbon first, then found the multicolored polka dot ribbon, and luckily found 3 other colors of polka dot ribbon that just matched!
I wasn't sure what length to cut, so I guessed. :) I don't think any two pieces were the same length.  All the pieces were right around a foot long though.  I tied double knots, and tried to stagger them so the orange wreath wouldn't show through.  I didn't use the multicolored ribbon as much as the solid color and I think it makes it look better.   I love a good craft project that allows me to sit on the couch and only took around 30 minutes.  I had a hard time not making a pattern since I'm so obsessive compulsive at times.  I do really like the unorganized look of it surprisingly.  
After making this wreath I really want to do another one.  It was super easy and would be a great project for kids because as long as you can tie a knot you can do it.  
I thought that adding a big bow or an initial would be cute.  I'd like to try making one using a variety of one shade of color (like all pinks).  
A fun afternoon project for sure.
:)
Enjoy- Miranda