So cute!!!!
So, moral of the story: Don't be afraid to buy things out of season! You will seriously not regret it the following year, plus you'll get to brag about how cheap your finds were! :)
Showing posts with label cheap. Show all posts
Monday, April 13, 2015
After Easter Finds
I've always been a big believer in shopping 'out of season.' As in, shopping for winter clothes in summer, summer clothes in winter, and buying holiday decorations after the holiday. You can find some awesome deals that others pass up simply because they aren't in the mindset to buy because the holiday has passed. Case in point: these 2 super cute Easter pictures! I found these at TJ Maxx this weekend, sitting all lonely on the bottom shelf, just begging to be purchased. They had originally been $19.99 (TJ Maxx price- I'm sure much more anywhere else), but I snagged them for $7.50 each! I love them and I just know they will be super cute to decorate with....next year. I don't have any problem buying them now, storing them, and then enjoying them later. Plus, it will be a little surprise when I unpack them next spring!
Sunday, March 22, 2015
Craft Closet Makeover!
A couple months ago I taught a class for the women at my church on organization. I love organization and having things in order, so I wanted to help inspire others to be that way too. Some of the ladies joked that I probably didn't have any space in my home that wasn't organized. It's almost true, pretty much every space is organized, but organization is an on-going process. You have to keep it up, or you'll end up right back where you started. Case in point, my craft closet.
Now, it wasn't horrible, but it was pretty bad. I had gotten into the bad habit of just laying stuff inside and shutting the door, telling myself I would put it back in it's correct spot later. But 'later' never came. I realized that the problem was that I didn't have a clear system of of organization, that's why I was just throwing stuff in. So, I set out to correct the issues. I followed the simple 4 steps of organization that I had shared with my class of ladies.
1. Take everything out
2. Clean it
3. Sort it
4. Put it back (in an organized manner)
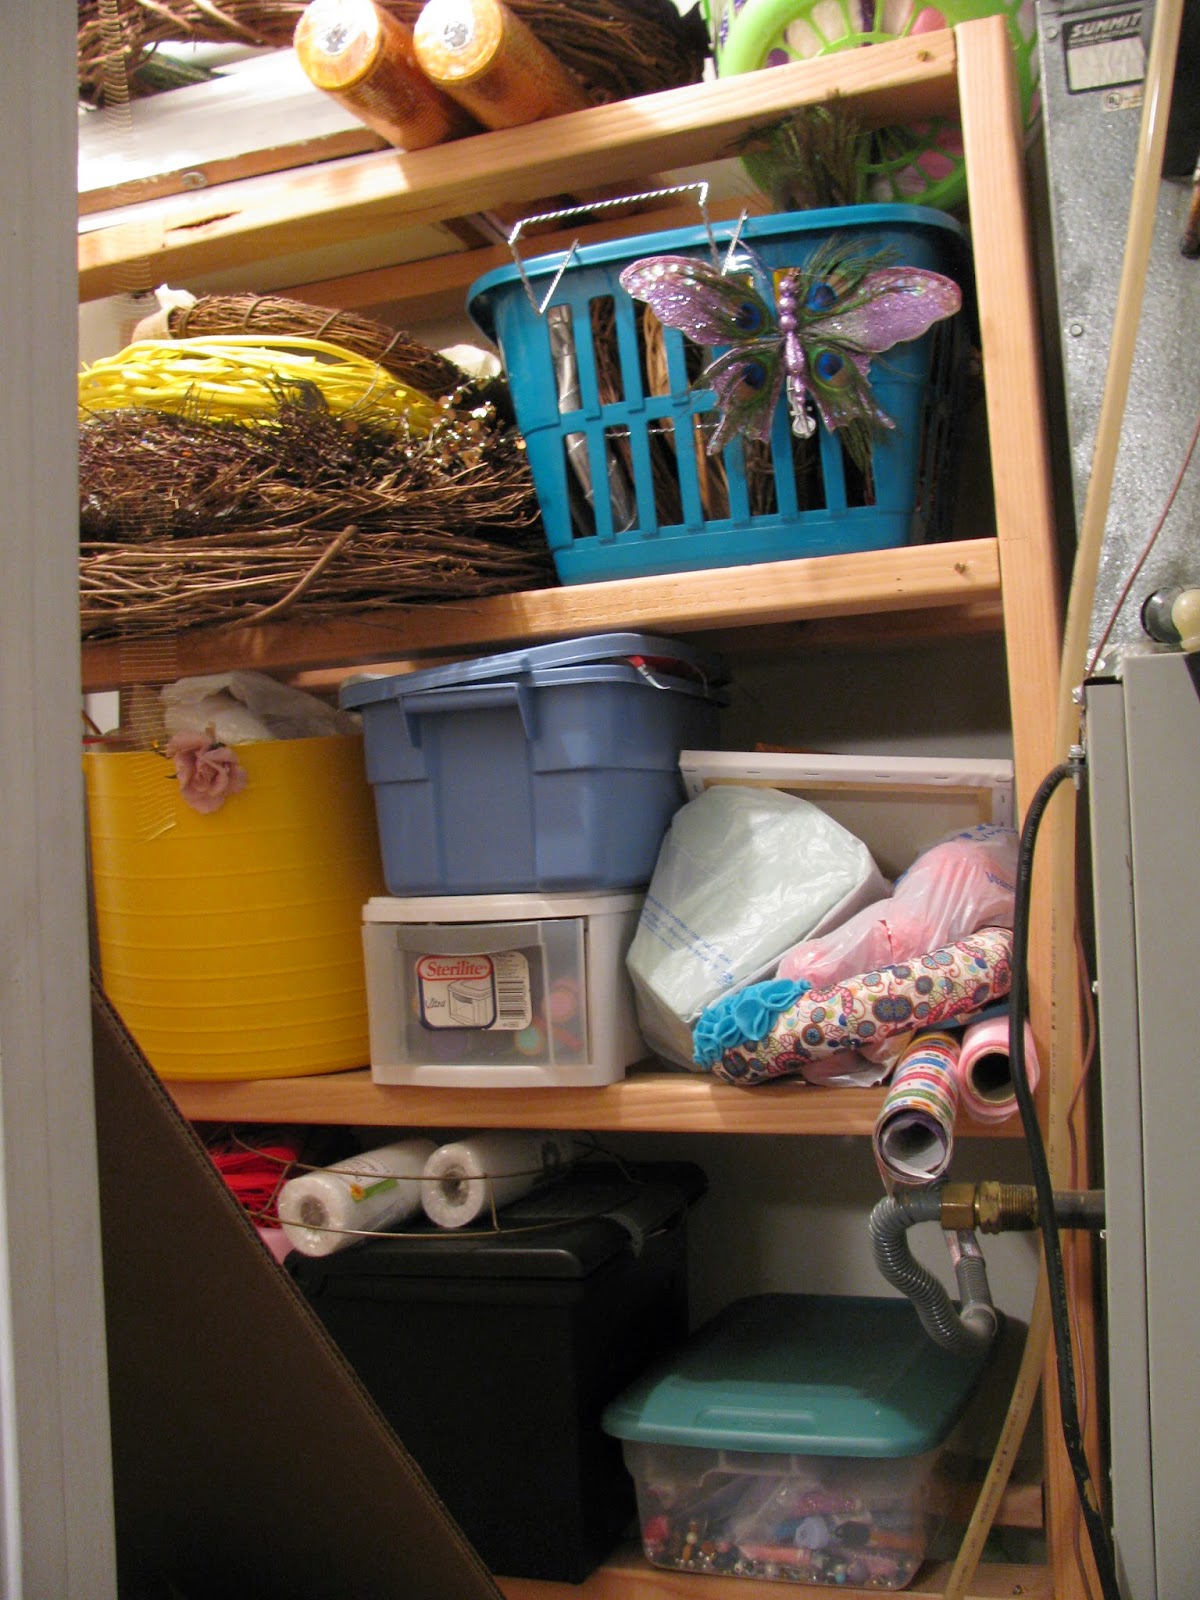
The 'before' picture!
Like I said, not a total mess, but pretty chaotic.
My craft closet is in our laundry room. It's actually the closet for the hot water heater, but there is enough room for storage too. My husband built shelving a couple years ago for his hunting supplies, but after he moved that stuff out, it became my craft closet. It works great because my craft table is in the laundry room too. So, everything is reachable when I'm crafting. :)
I found these shoe box sized plastic bins at Wal-Mart for only 94 cents! These are much more durable than the dollar store version, plus they're a few cents cheaper. I bought 10, and ended up only using 7.
Like I told the ladies in my organization class, the first step is to take everything out.
Step 2 is to clean it! I took the vacuum cleaner extension and cleaned the floor. But you know how glitter is, I couldn't get it all up, no matter how hard I tried.
It is amazing what all can fit into such a seemingly small space.
As I was pulling items out, I realized that this 1 bin was the source of my frustration, and the reason why I often didn't put anything back. Most of the small stuff was just thrown in here, in no sort of organized manner, so of course I wasn't putting things back because they were just being thrown in a bucket.
Step 3 was to sort it! I went through everything and ended up with a couple bags of things to get rid of. It's so hard to get rid of crafting supplies because you never know when you'll need something. I also put some seasonal items in the attic.
Step 4 was to put it back in an organized manner. I used my new plastic bins to organize all the little stuff and keep 'like' items together.
After I had all my items in their organized bins, I made labels to put on the bins so I would know exactly what I had in each one.
I used Microsoft Word to make the labels. I made a 2 column table and printed it out on bright paper. Make sure you use a large, bold font so you can see it clearly. I also made labels for the organization tray on my crafting table that holds highlighters, paperclips, etc.
I just used clear packing tape to attach my labels, that way in the future if I need to change the label, I can just peel the tape away and be left with a clean slate.
Now, with the combination of the clear boxes and labels I should be able to find anything I need easily and put it back in the right spot.
For my felt, material, and scrapbooking paper I used hanging file holders to keep everything in order. So now I won't have to dig to the bottom for the 1 piece of blue felt I need.
I had file folder I used to organize the paper, but they were just falling over. The hanging file folders fixed that quickly and made it look much more organized.
Now my craft closet is much more organized! I know where everything is, and I can get to it! I was also reminded of all the crafting supplies I have and it just makes me want to start crafting something new!
Saturday, February 28, 2015
Craftin' with Target Finds: Spring Wreath
I absolutely LOVE the $1 spot at Target! I know there are millions of other women out there that love it too. I can always find something, and I don't feel guilty buying it because it's only $1 or $3. Yesterday I went to Target and they had just put out some new merchandise in this spot and I had a hey-day! I must have made 3 or 4 circles around it to make sure I saw everything. They had gotten in some really cute Easter items that I scooped up, and some awesome items to make a spring wreath with. We've had some ugly winter weather and I'm dreaming of spring time, so what better way to lighten up the day then with a spring wreath? What makes it even better is that it only cost me $8!
I cannot wait for spring time to get here and it better bring some warmer weather quick! Even if there is snow on the ground and it's below freezing outside, it can still look like spring inside! :)
Here is what I bought to make my wreath!
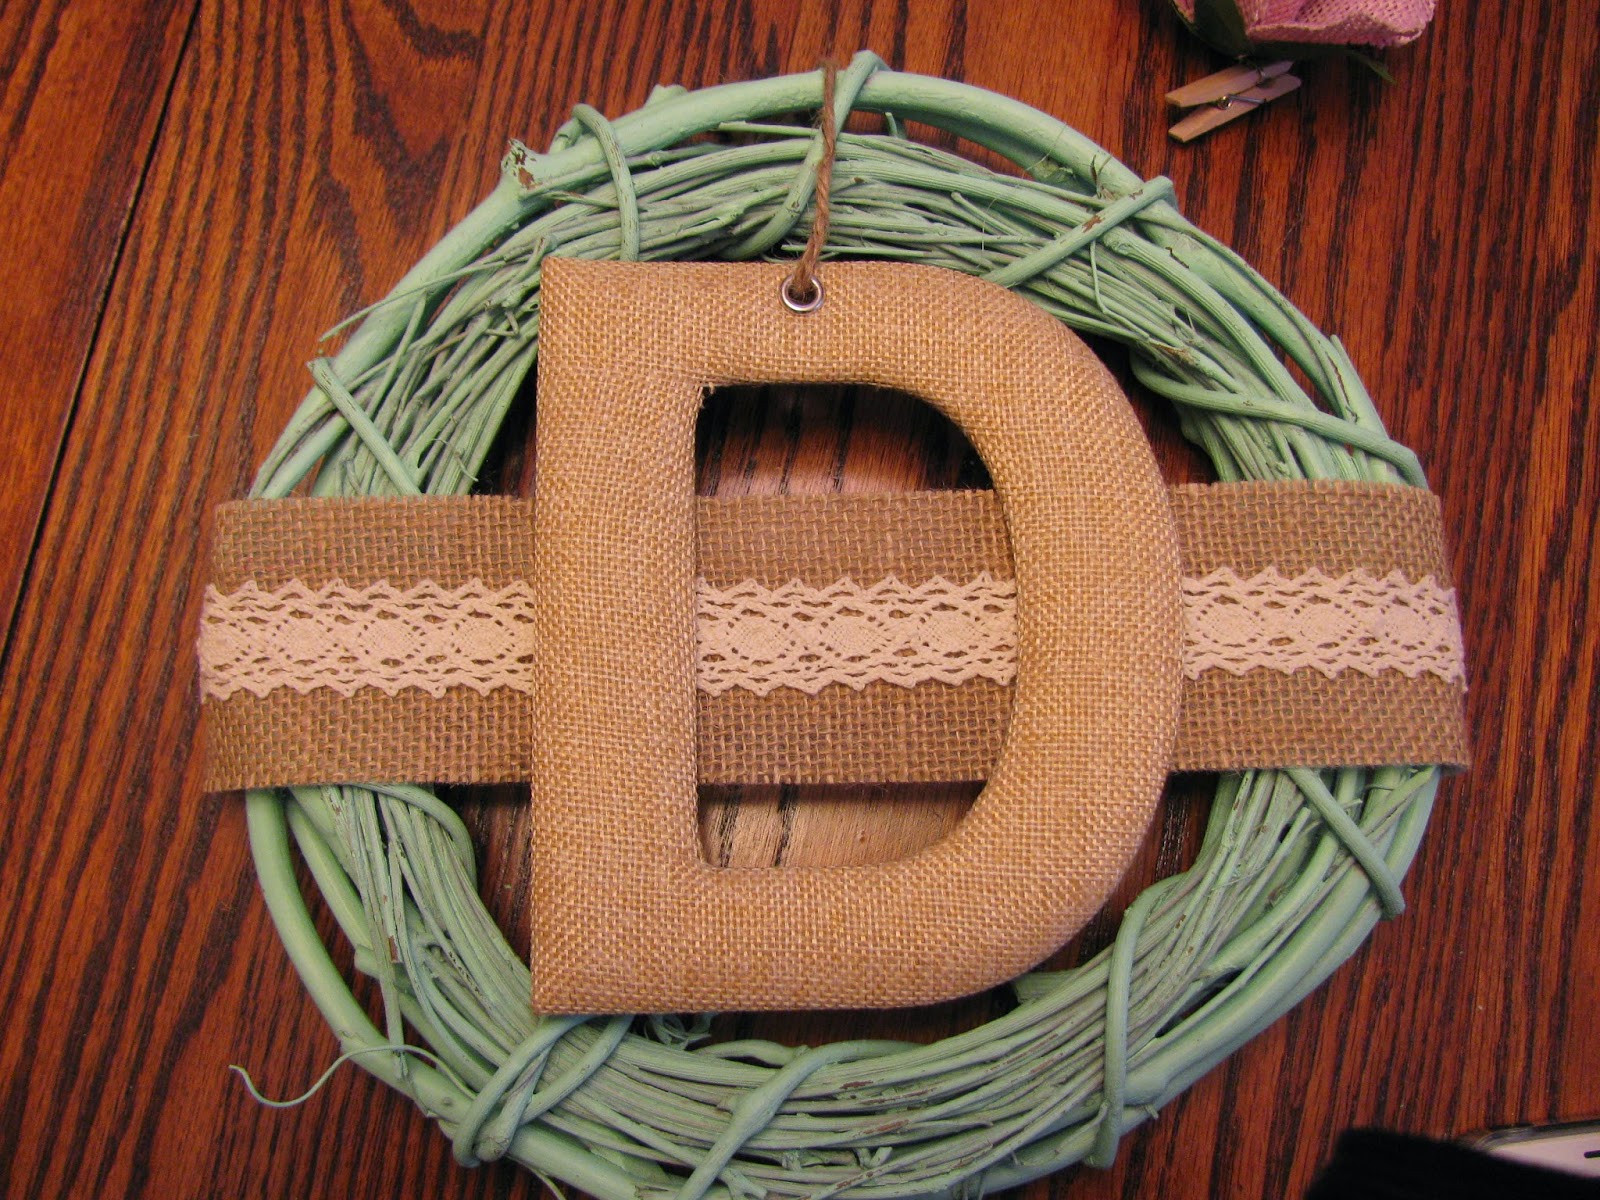
The grapevine wreath was $3, and everything else (burlap letter D, burlap ribbon, crocheted lace, burlap flowers- 2 pack with cute pearls in the middle- and 2 pack of pink burlap flowers) were only $1 each.
I played around with the layout a little bit before deciding on what I liked.
I attempted to cover up the silver circle on the D from where the string had been hanging. I decided just to leave the string because this looks silly. :)
I used the burlap and crocheted lace to make a 'background' (for the
lack of a better word). Just a dab of hot glue secured the lace to
the burlap.
It looks crooked but it's just because it isn't glued down yet.
Then another dab of glue to secure it to the wreath.
It is well on it's way.
I readjusted the string on the letter D (our last name initial)
so it would hang better.
I was going to add a bow, but I thought it
looked too cluttered, so to hang it on our door I used the string from the letter D.
Just a dab of glue to secure the flowers and it is done!
I LOVE LOVE LOVE the gorgeous teal/mint color of the wreath! I think the burlap and touch of pink give it the 'just right' spring time feel. It looks shabby chic too which I love!
The best part is that it only cost $8!
I cannot wait for spring time to get here and it better bring some warmer weather quick! Even if there is snow on the ground and it's below freezing outside, it can still look like spring inside! :)
Friday, January 2, 2015
$88 top for $2.98!
It is from White House Black Market. I love that store but never buy anything because it's just a little too expensive. This top was ticketed at $88 and had been marked down twice, once to $49.99, then to $29.99. Well, lucky for me, it had also been marked down twice at the thrift store. It started out at $9.98, then it was marked down to $4.98, but I purchased it for only $2.98! WOW!
Now, it is not typical to find new items at thrift stores, but it is possible. You just have to dig sometimes. The Value Thrift Store in Tulsa is large, it took me about an hour and a half to look around. What I love about this thrift store, besides it's size, is that they mark their items down. I think once a week they go through and mark down everything before placing new items on the floor. This not only helps the customer get even better deals, but they are able to have a good turnover on their inventory. I really wish more thrift stores did this, because I think it keeps the customers returning more frequently because we know there will always be a change of inventory.
I wish I could say I find good deals like this every time I shop in a thrift store, but unfortunately, I don't. There are lots of times I walk out empty handed. This probably happens to you also, but don't be discouraged, next time you might find a whole cart load of items!
Happy New Year and Happy Hunting!
Saturday, December 6, 2014
Christmas Crafts: Not so traditional ornaments
Here are the ornaments laid out and some little bits of ribbon I had leftover from other projects.
The first step was removing the chain part from them, expect for the ones from China, they didn't have an extra loop at the bottom to string the ribbon through.
The Africa key chain was given to me by a Wal-Mart shareholder from Africa when I worked at TJ Maxx. He had one on his lanyard and when I told him I liked it, he pulled a handful out of his backpack for me to share with the other employees.
The flamingo one is from a trip my sister took to the Bahamas (weird how it sounds normal to say 'the Bahamas' instead of just Bahamas...anyways).
The New York one is, obviously, from New York, yet another trip my sister took.
The last three are from China, and yet another trip my sister took. She's quite the world traveler. At least she brings me back presents! :)
All I did was attach some ribbon to the key chains and then hung them on my tree. Super easy- just the way I like it! And cheap- I didn't have to buy a thing!
I also hung one of my college graduation tassels from the tree, once again so it can be appreciated at least once a year (I can only find one of three.... they've got to be somewhere).
I also added ribbon to my chapter officer badge from when I was involved with Phi Theta Kappa in college.
So, not your 'traditional' ornaments but fun anyway. Like I said, I hated for this stuff to be just sitting around or thrown in a drawer. Now, they can be displayed and admired once a year.
Another little trick I started doing this year was writing on the back of ornaments what year they reference. For example, we took a trip to Las Vegas in May and I brought back an ornament, so on the back I wrote May 2014 so when we are old and gray we can remember when we went. Also, we got a cute ornament in honor of our new puppy, Molly. It says 'rescued is my favorite breed' and I wrote the date we adopted her on the back.
I hope this gives you some ideas of items from around the house that can make cute ornaments. Of course this wouldn't work if you have one of those fancy trees where all the ornaments have to match or be a certain color. We aren't like that- ours is a modge-podge of colored lights and ornaments. But it is a fun way to display those memories.
Sunday, November 30, 2014
Christmas Crafts: $6 wreath
I've been getting crafty lately and I have some cute new projects to show off. Here is the first one that I just completed today and it took literally 2 minutes (not counting the time it took for my hot glue gun to warm up).
The super simple, but extremely cute, welcome wreath only cost me $6 and like I said took no time at all to make!
All you will need is the welcome sign, a wreath, and a hot glue gun.
The super simple, but extremely cute, welcome wreath only cost me $6 and like I said took no time at all to make!
All you will need is the welcome sign, a wreath, and a hot glue gun.
The welcome sign was only $1 at Deals. They had some other cute decorations from $1-$5.
The wreath was only $5! They had gold and silver too at my local Deals store.
All I did was remove the ribbon from the sign (save it), added a little hot glue to the back of the sign, and then stuck it on the wreath.
I used the ribbon from the sign to hang the wreath from my door hanger. Easy as pie and super cheap!
I urge you to check out your local Deals or Dollar Tree or whatever your 'Dollar Store' is called. They have super cute decorations! I have some other cute projects I made using dollar store items, check back for those posts soon!
Sunday, September 21, 2014
Sunday Funday Craft
I'm sure everyone has seen all the cute canvas crafts there are on Pinterest. There seem to be thousands of ways to use canvas. It's been probably well over a year (....or two) ago I tried to make a craft with a canvas where you place stickers on the canvas, paint over it, then peel the stickers off and the words are left on the canvas. Please tell me you know what I'm talking about...if not, look it up. It usually turns out really cute, well I had a Pinterest Fail with mine.
Well, that was my Sunday Funday Craft. It was super easy, fast, and cheap- use what you already have and coupons! Now, to relax before another week gets started. :)
Exhibit A:
You can hardly see the letters but the stickers wouldn't peel off. I think it was my own fault for using cheap stickers.
But anyways, it didn't work and I thew the canvas in the closet and forgot about it. More on that in a minute.
Fast forward to this past July. My friend Becca's birthday was coming up and I wanted to make a cute craft for her since she appreciates that kind of thing. I once again saw some really cute canvas ideas on Pinterest. These showed covering a canvas with fabric and attaching a letter. So, off to Hobby Lobby I went. I purchased a larger canvas than I had used before, some cute gray fabric that matches her couch, and here's what Becca didn't know, I re-used the letter 'C' (her last name initial). My mom was going to do a project with it and had painted it red, but she ended up not using it, so I took it, and had my husband spray paint a few coats of yellow over it to cover up the red. I didn't take pictures of the whole project, but I did for my next one. But here is how her present turned out. Super cute if you ask me, and her. :)
My husband's handy work was the back. He used a razor blade to cut off the excess fabric. I love it when the back side looks just as good as the front. These little details matter, especially since it was a present.
And now, fast forward with me to this afternoon. And then rewind with me to a year (...or two) ago when I had the epic fail with the other canvas. I decided to try to cover up my past mistake and make myself a 'canvas-covered-with-fabric craft.' I went to Hobby Lobby yesterday and found some cute material to cover the canvas with. Side note: have you seen how many cute fabrics are out there now? I could have spent hours just in the fabric section.
I already had the other items I needed: wooden letters, hot glue gun, staple gun, razor blade (box-cutter kind of something), scissors, and spray paint.
First, I spread the material over the canvas and got it into a position I liked. The material I picked out had little birds and I wanted to make sure a bird was in a good spot and wasn't covered up, because they were just so darn cute! You can also play around with the position of your letters. I'll explain the phrase I used later. :)
Then carefully, I cut out the rectangle I needed. Don't worry too much about getting straight lines. Next, iron your piece of fabric, because we aren't heathens and we want it to be wrinkle free on the canvas.
Oh, actually, before all that, spray paint your letters because that part takes the longest. I picked just plain white, but it really pops against all the colors of the fabric. Side note: Rustoleum spray paint is the best...ever...really.
So, once you have your material cut out and ironed (mama didn't raise no fool), it's time to staple it to the canvas. Try to use as much care as you can, and pull the material so it is as tight as you can get it. The end product will look a lot better. Also, make sure you fold the material so the corners look good. Use a razor blade or scissors to cut off the excess material.
After stapling the back and trimming the rest of the material. Sorry that it's sideways, I make no claims to be a photographer.
Spray paint another coat on your letters. These little letters had a tendency to get blown around by the spray paint so be careful that you don't loose them. Then, wait as patiently as you can for the spray paint to dry. I have very little patience so I picked mine up while they were still a little sticky, oh well. Attach the letters with hot glue and you are done!
My finished project all ready to be hung up in my bedroom.
The phrase 'You make me, me' is actually a song title and lyric. 'Our song' actually. It's by a band called MxPx (my husband introduced me to them while we were dating, hadn't heard of them before that or since, but they have some good songs). Anyways, the song was played at our wedding, and my husband actually had the phrase engraved in his wedding ring. It's a cute song about how you make me who I am. Aw, gushy stuff I know. :) Anyways, it made for a cute project.
Oh, and while I was at Hobby Lobby yesterday I checked out their clearance section, and found some cute photo albums for only $3.59! A great find if you ask me. :)
Well, that was my Sunday Funday Craft. It was super easy, fast, and cheap- use what you already have and coupons! Now, to relax before another week gets started. :)
Tuesday, September 16, 2014
Kitchen Signs
About a year ago (has it really been that long!) I wrote a blog post about some projects I was completing in my kitchen. Click here to view that blog post.
One of the projects I did was super cheap, super cute signs for above my kitchen cabinets. Well, I thought of a couple more I wanted to make and in no time I had them finished and sitting above my cabinets.
All it takes is a $1 document frame from Deals (or any dollar store type place), spray paint, Microsoft Word, the internet, and a printer.
I knew the two sayings I wanted to use, I just had to search for the pictures to add to it. Here are the finished projects.
One of the projects I did was super cheap, super cute signs for above my kitchen cabinets. Well, I thought of a couple more I wanted to make and in no time I had them finished and sitting above my cabinets.
All it takes is a $1 document frame from Deals (or any dollar store type place), spray paint, Microsoft Word, the internet, and a printer.
I knew the two sayings I wanted to use, I just had to search for the pictures to add to it. Here are the finished projects.
Feed Your Faith, Starve Your Fears
and
It's My Kitchen and I'll Fry If I Want To
This is such a fun, easy project. The spray painting took the longest, the yellow frame took a few coats to cover the black frame. I love how cute they turned out and how inexpensive! Decorating doesn't have to be an expensive endeavor, just get creative and make your own projects to help keep the costs down.
Maybe in another year I'll think of some new sayings to print out. :)
Friday, July 18, 2014
Amy's Pink Elephant Baby Shower
I have been meaning to blog about hosting a baby shower for my sweet friend, Amy and her husband Robert, for months now (it was in January and her baby girl is 5 months old now). I had never hosted a shower before, so I was afraid I'd be in a little over my head, but thankfully, I had two other sweet gals, Trisha and Erin, to help me out. Between the three of us, the event turned out amazing! I was worried about finding pink elephant decorations, but things always
have a way of working themselves out. The three of us worked really
well together. We each took an area (decorations, food/cake, and games)
and ran with it!
We made it a couple's shower and made the boys come too! They had their share of fun, right along with the girls. :)
Of course being the thrifty gal I am, I tried to keep things as cheap as I could. Here are some pictures from the shower. Feel free to copy any ideas you see, but please give credit where credit is due. :)
*I am in no way, shape, or form a photographer- keep that in mind. :)
We made it a couple's shower and made the boys come too! They had their share of fun, right along with the girls. :)
Of course being the thrifty gal I am, I tried to keep things as cheap as I could. Here are some pictures from the shower. Feel free to copy any ideas you see, but please give credit where credit is due. :)
*I am in no way, shape, or form a photographer- keep that in mind. :)
We held the shower in my church fellowship hall (for free!) on a Saturday in the afternoon.
I got some balloons to put out by the road and near the entrance so the out of town guests would know where to go. They were only $1 at Deals! These pink tissue pom-poms came from Hobby Lobby (using a 40% off coupon). They are easy to make, but just as cheap and easy to buy. Plus they can be reused. I should have bought a bigger pink tablecloth, but I had nice white cotton ones underneath so that helped.
Since the parents-to-be have many different interests, I decided to make each table a little different to keep things interesting. Plus, I kept finding cute decorations! Those are mints on the table, also from Deals for only $1. The tablecloth is from Wal-Mart and was so cute with the little bows on it!
These elephant decorations were a great find! I had no idea how hard it would be to find pink elephants for a baby shower. A local party store had a few great items like this tablecloth and table decoration.
Since it was a couples shower and both Amy and Robert love to hunt, I just had to do a camo table. A local party store had this pink camo tablecloth and the sticks are from my backyard. I painted one pink to help tie it all together.
Here is a closer look at the diaper cake. I can't take much credit for this because my mom made it. She loves making these and has the process down to a science now of how to build them. The flowers came from Hobby Lobby, the pink one is a hair clip and the black ones can be made into them for when Baby Oakley gets bigger. Amy also told me she saved the ribbon to be used for something later on.
I found the pink elephant at a Christmas sale at a local DaySpring store. It sings 'Jesus Loves Me.' It was a small miracle, I believe, to find a pink elephant!
The 'crinkle paper' around the diaper cake is from Deals also. A little goes a long way!
Part of my gift to Baby Oakley was this wreath made out of tulle. The letter was already pink and glittery from Hobby Lobby and I bought it when it was on sale 50% off. I also gave Amy a door hanger, I always think that is a good idea when giving someone a wreath because they might not have one.
This was one of the activities. Diaper Notes! It is so much fun- you just provide guests with sharpies and diapers and let them write fun notes for the parents to read when changing diapers. It does help to remind people to write high up on the diapers so the ink doesn't bleed through when the baby does her business. :)
I re-worked the poem found off of Pinterest (there are several versions found on several blogs).
The gift table.
I made the elephant banner by simply doing an image search for an elephant outline (I used the same one for the invitations) and then just printed several off on a few shades of pink paper and hung them up with tiny clothespins.
Trisha, another hostess, had a friend of hers make the cake and cupcakes which were delicious! These were pink camo since Amy likes to hunt!
The amazing cake! Trisha sent her friend a picture of the elephant I used for the invitations and other decorations and she copied it to make the cake topper! This girl was amazing and just does cake decoration for fun. :)
For whatever reason I can't get this picture to turn the right way, but the cake topper also has a cute little 'Welcome Baby Oakley' tag.
It's amazing how things work out, we found these pink elephant cake plates at Wal-Mart!
Trisha made some great little snacks.
The punch was a simple mix of pineapple sherbet and strawberry soda.
I made this banner as well using the same elephant outline, pink paper, and tiny clothespins. I used a great tutorial to help get me started on the banner from justagirlandherblog.com.
Erin thought up some great games and had amazing prizes for the winners.
-The Clothespin Game: Everyone starts out wearing one clothespin and the taboo word is 'baby.' Anytime you hear someone say the word 'baby' you can take their clothespin. The person with the most clothespins at the end wins!
-Bottles Up: The mother-to-be chooses a group of men to drink from a bottle as fast as they can. The first one to finish their bottle wins! We had 5 guys participate, you could have more or less depending on your crowd, and you could also draw names instead of having the mom-to-be pick. A note of warning though, it takes a lot longer to down the drinks than you would think, so don't put too much in there.
-Words of Wisdom: Place note cards and pens at each table and let the guests write 'Words of Wisdom' or funny stories for the parents to read. The cards can be placed in a photo album or on a ring.
We had such a great time hosting this shower and blessing our dear friend. Having a small group to help host a shower is ideal. Just make sure everyone is on the same page about what their role is. I love to decorate so I fell into my role naturally, and the other hostess were fine with that. Just make sure you all talk and make any important decisions together, but also have the trust to make other decisions on your own.
I recently hosted another baby shower for Erin, who helped with this shower, pictures of her event to come soon!
Subscribe to:
Posts (Atom)